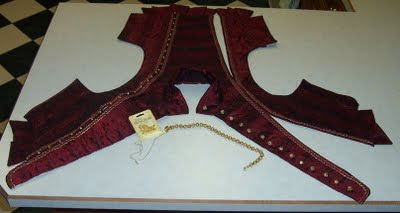
I've been putting off working on the doublet because I did not feel like making the lacing strips. Once the Shoulder seams of doublet had been stitched, I laid it on pattern paper and made a one piece armhole facing pattern, and a pattern for lacing strips. At the top of the photo below is a lacing strip, then the side front/back of the doublet from the right side with the armhole facing stitched down and cut with pinking shears in preparation for turning. At the bottom of the photo is the other side front/back doublet piece from the inside showing the armhole facing turned in and the lacing strip attached. To allow for changes in size in the doublet, I made the side seam 1.5" in case it needs to be altered in the future. The lacing strips stop at the actual seam line.
I cut the armhole facing out of one layer of taffeta and one layer of red canvas. If you look at the photo, the vertical sides were finished and then the facing was stitched to the armhole and flipped to the wrong side. I cut 8 lacing strips - 4 out of the taffeta and 4 out of cotton. For the strips that were going to be attached to the doublet, I pressed under the seam allowance of one short end and then stitched the long side closest to the armhole at 1/2" seam allowance, the short end at the standard 5/8" seam allowance, and the long side closest to the armhole at 1" seam allowance, and turned inside out. I topstitched the remaining short side closed and spaced out small buttonholes at roughly 1" intervals all along the strip. You have to have a left and a right! Then I pinned the lacing strip onto the armhole facing slightly offset from the finished armhole edge and edgestitched the long side furthest from the armhole. The lacing strip that will be attached to the sleeve top was stitched at 5/8" seam allowance on the two short edges and the long edge furthest from the armhole, turned right side out, pressed, and matching button holes were stitched into these as well. After the lacing strip was attached to the armhole facing, the facing was basted to the fashion fabric raw edges at the princess seams and that seam was covered with a strip of bias taffeta machine stitched to the right side, flipped to the back and stitched down by hand. At piece of trim was hand stitched to the side and front/back doublet sections next to the bias bound princess seams. The finished edges of the armhole facing were also stitched down by hand.
I searched all over for appropriate buttons - and finally found what I was looking for in an unlikely place....
My friend Jennifer owns an antiques and gift shop called Past and Presents and had a two strand necklace of sturdy gold filigree beads. On a Saturday afternoon I remembered it and called her and asked her to count the beads for me because I couldn't remember if there were enough! She has helped me with several jewelery pieces for my costumes and I have also gotten lots of help and beads from another friend in town, Kathleen, who owns and is The Bead Lady. But I digress....
Here is a flat view of the doublet with the necklace bead "buttons" down the center front. I used the gold spacer beads from the necklace as my button shank, sewed through the large filigree bead and topped it off with a tiny golden seed bead. To join the sides to the front/back portion, I am using much smaller filigree beads to cover where I tack the bias sections together. I am stitching a bead at each stripe in the front/ back portion - there are 28 per side. My fingers are sore! Here is another view of the doublet with center front buttoned and one princess seam joined with small filigree beads.
Just finished putting on the rest of the beads - now to sew the side seams and try it on!!!!
The way I have made the lacing strips to attach the sleeves to the doublet, it will look like the sleeves are actually set in. At some time in the future (translation - after IRCC is over) I hope to make another set of short puffed sleeves as an alternate. Because I want this costume to be versatile, it is more complicated to make. Stitching the hanging sleeves to the doublet would have been much easier!
Next are the hanging sleeves.


No comments:
Post a Comment